Part 3.1: Windows Container (WCOW) Networking.
Links to the previous posts:
This is a first part of the networking series more would come out soon. Networking is a vast topic, so will touch upon the topics which are necessary for the containers. The communication is an important channel, and it’s a crux for any system. Effective communication is a base for any robust system. Therefore, containers hugely depend on the network for communication. We’ll cover the networking concepts applicable to windows. Microsoft is pushing lots of improvements in the network stack to increase the compatibility with docker, but still, it has a lot to achieve. Microsoft has launched two channels through which they’re pushing the improvement out for experimentation. You can read more about the same from here.
Currently, they’ve launched two versions of window server 1709 and 1803 which has improved, i.e., support for ingress routing for a swarm (will write more in upcoming posts). excerpt out-of-excerpt
The question which I get most in discussions is:
How the docker works on windows?
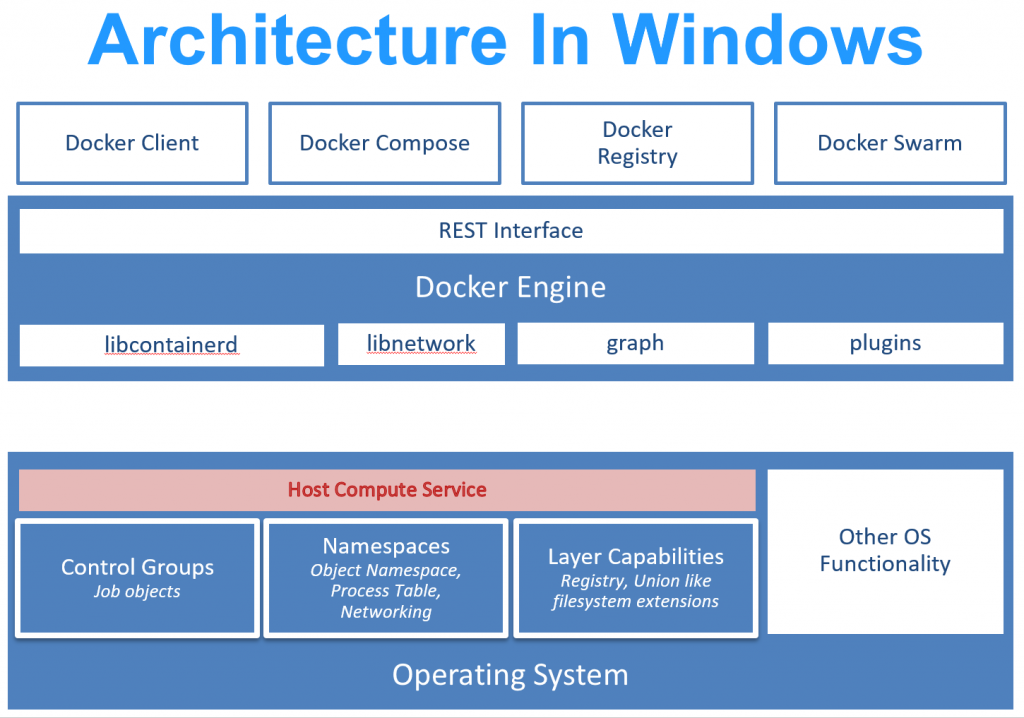
In Windows, Docker CLI uses docker engine rest API to perform the tasks, i.e., creating a new container/network. Docker engine internally calls containerd and runc component of docker to do the low-level tasks which require interaction with the kernel, Cgroups. In Linux, this interaction is direct from containerd to kernel and cgroups, but this has been abstract out on windows. Since the window is new in this game, therefore, frequent changes are required to stabilize and increase the compatibility with docker. The windows team added a layer of abstraction (Service) on top of low-level components, i.e., kernel, cgroups. This service is called HCS (Host Compute Service) and HNS (Host Network Service) which do all the low-level work.

Let’s jump into the core of the networking and understand more about it!!!
How the container interact with each other?
Containers are depended on WNV (windows network virtualization). The WNV is vastly used with VM’s and developed to cater the needs of VM’s. Same concepts are applied on containers as both are moreover similar to each other excepts containers doesn’t have its kernel and depend on hosts.
Another question which is pin-up in everybody’s mind is –
How virtual networks avoid any mix up (maintain total isolation of traffic from each other)?
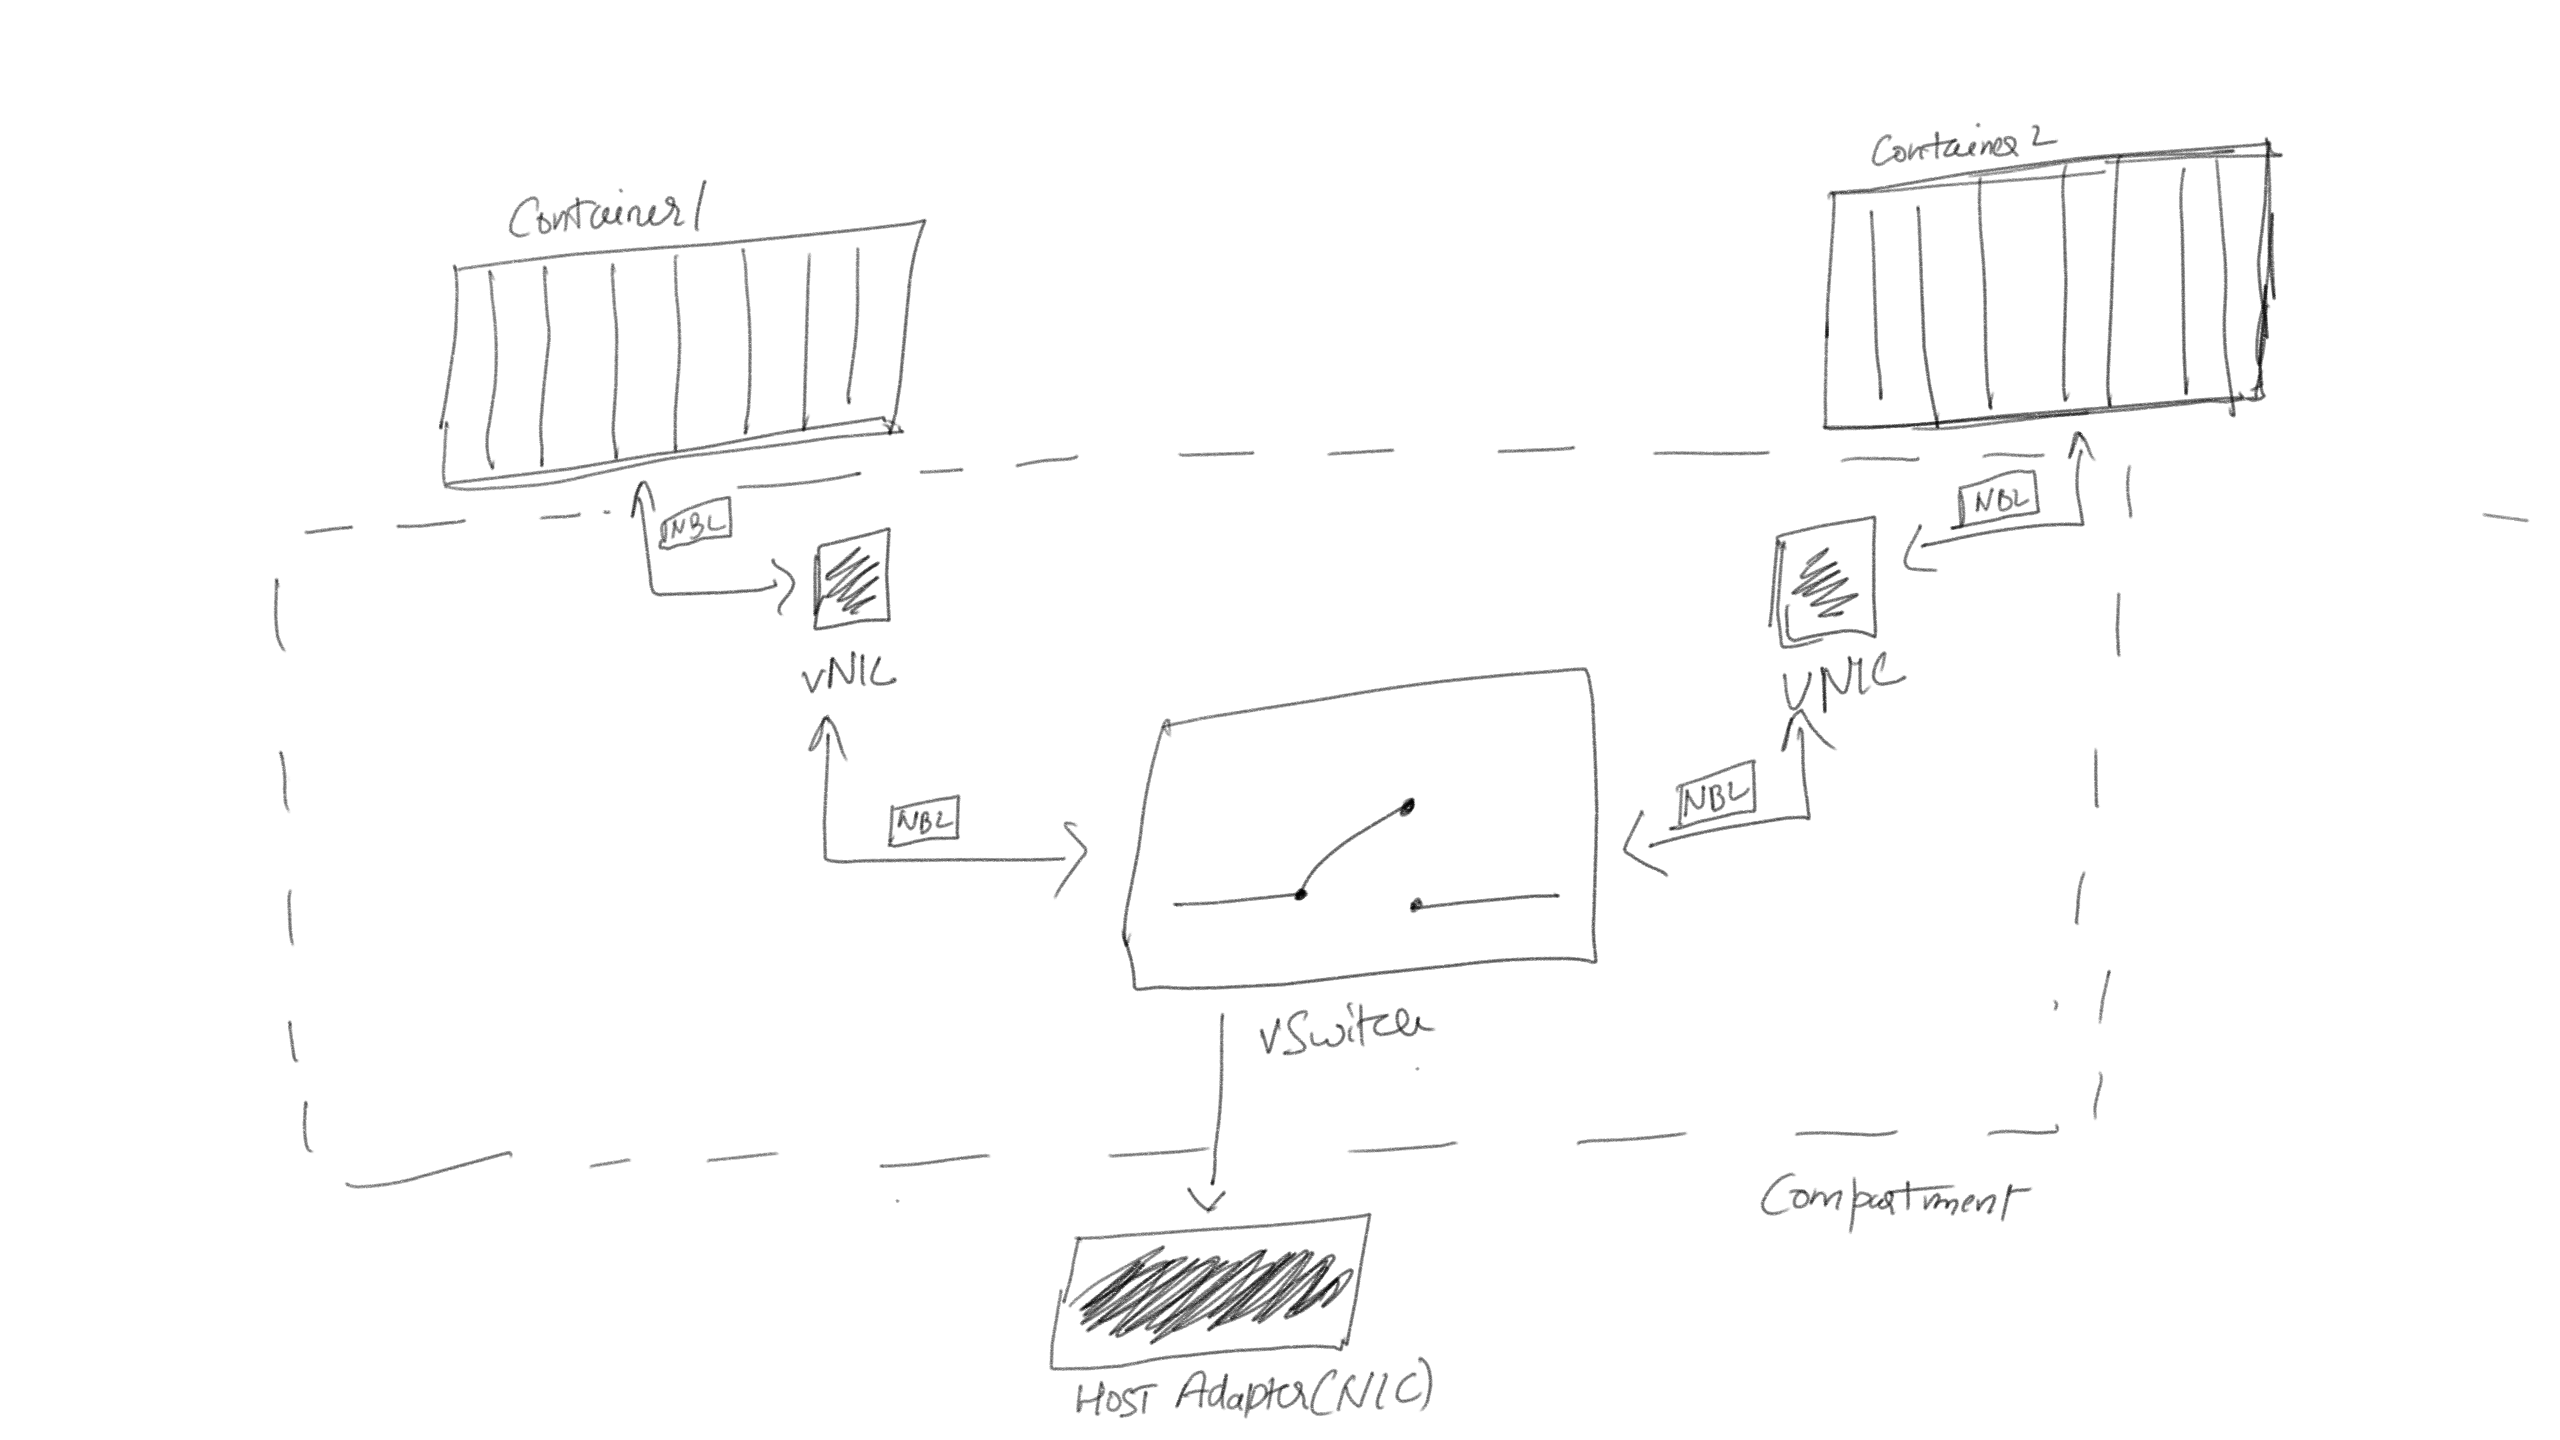
In windows, each container network gets created and work under separate compartments which avoid any mix-up and provide total isolation of traffic. Each container has vNIC (virtual network interface) which propagate data through vSwitch (Virtual Switch)and gets routed to different vNics. The vSwitch is of two types:
- External (This can communicate with the host physical adapter directly)
- Internal (This cannot communicate with the host physical adapter directly)
*Install hyper-v tools if VM commands are not working on your PowerShell – “Install - Add-WindowsFeature RSAT-Hyper-V-Tools -IncludeAllSubFeature”
Check the available vSwitch on your system:
Command
Get-VMSwitch

Check all the compartments gets created with containers for traffic isolation and security:
Command
Ipconfig /allcompartments
The data move in the form of particular packets called NBL (Net Buffer List) within the system. The NBL packets are transferred by containers which get routed and received by another container NIC. The virtual network uses NBL packets to move the data internally which gets routed via a switch. To capture the container traffic (NBL packets) then follow the steps:
- Create a new session to capture the container traffic. Capture a session in ETL file and assigning the dynamic name to the file.
PS C:\> $timestamp = Get-Date -f yyyy-MM-dd_HH-mm-ss
PS C:\> New-NetEventSession -Name Session1 -LocalFilePath c:\$env:computername-netcap-$timestamp.etl -MaxFileSize 512
Output
Name               : Session1
CaptureMode        : SaveToFile
LocalFilePath      : c:\<name of the file>.etl
MaxFileSize        : 512 MB
TraceBufferSize    : 0 KB
MaxNumberOfBuffers : 0
SessionStatus      : NotRunning
- Adding a provider to capture the traffic.
Use “Microsoft-Windows-NDIS-PacketCapture” or Add-NetEventpacketCaptureProvider:
PS C:\> Add-NetEventPacketCaptureProvider -SessionName Session1 - Start a new Session to capture the traffic.
PS C:\> Start-NetEventSession -Name Session1 - Check the status of the capture.
Ensure the capture is running and check the last output line named SessionStatus:
PS C:\> Get-NetEventSession
Output
Name              : Session1
CaptureMode       : SaveToFile
LocalFilePath     : c:\<name of the file>.etl
MaxFileSize       : 512 MB
TraceBufferSize    : 64 KB
MaxNumberOfBuffers : 30
SessionStatus      : Running
- Stop the session.
PS C:\> Stop-NetEventSession -Name Session1 - Remove the Session
PS C:\> Remove-NetEventSession -Name session1
We have captured the internal traffic and some of the NBL packets which is used for communication. Let’s check the data which gets captured in ETL file.
- Load and display the ETL file content.
PS c:\> $log = Get-WinEvent -Path <ETL file path> -Oldest

PS c:\> $log.message
- Output (Ping to bing.com)
1.	NBL 0xffff9383cbf21490 received from Nic 5AA3FFAC-AB7F-41DA-BD02-A4404FCA9241 (Friendly Name: f82c3ec1d0fe590) in switch D2FD9981-CB99-4866-9548-81F4ADEF178C (Friendly Name: nat)
2.	VMSwitch Packet Fragment (155 bytes)
3.	NBL 0xffff9383cbf21490 routed from Nic 5AA3FFAC-AB7F-41DA-BD02-A4404FCA9241 (Friendly Name: f82c3ec1d0fe590) to Nic 7F88B4C9-7ED6-4013-ADBA-4CE5A0C50487 (Friendly Name: Ethernet) on switch D2FD9981-CB99-4866-9548-81F4ADEF178C (Friendly Name: nat)
4.	VMSwitch Packet Fragment (155 bytes)
5.	NBL 0xffff9383cbf21490 delivered to Nic 7F88B4C9-7ED6-4013-ADBA-4CE5A0C50487 (Friendly Name: Ethernet) in switch D2FD9981-CB99-4866-9548-81F4ADEF178C (Friendly Name: nat)
- In first point, the NBL packet is reccived from NIC (name - f82c3ec1d0fe590) on switch (name - nat) for routing.
- The second point, packet info being captured.
- Third point, the packet is a route from one adapter (name - f82c3ec1d0fe590) to another (name -Ethernet) via a switch (nat).
- The last point, packet got delivered to the address.
Below are supported network on windows:
- L2Bridge
- L2Tunnel
- Transparent
- Overlay
- NAT
Command
Docker Info
Docker Network depends on drivers which are build by docker, platform owner or third party. Docker network follows a modular approach which makes the whole thing pluggable and platform independent.
Check the available networks installed with docker:
Command
Docker network ls
Two important things come under the network:
- Drivers
- Scope
Drivers:
We’ll take down one by one and learn more about them.
- NAT (Network Address Translation): This is a default network. When a container spin using “Docker run” command without (–network) argument then it will attach to the NAT network. NAT is a single host network which means container on the same network, on the same host interact internally. The NAT network is connect to internal hyper-v switch, underlying.

Let’s create a new NAT network and check its working.
Command
Docker network create -d nat {name of the network}

Corresponding to the newly created network, an adapter underlying gets created by HNS (Host Network Service).
Command
Get-NetAdapter

Spin up two containers attached to the new nat network and assigned the name for ref. WCOW1, WCOW2.
Command
Docker run -dt –network try-nat –name wcow1 microsoft\windowservercore ping bing.com -t
Now, let’s check the containers are part of a nat network or not.
Command
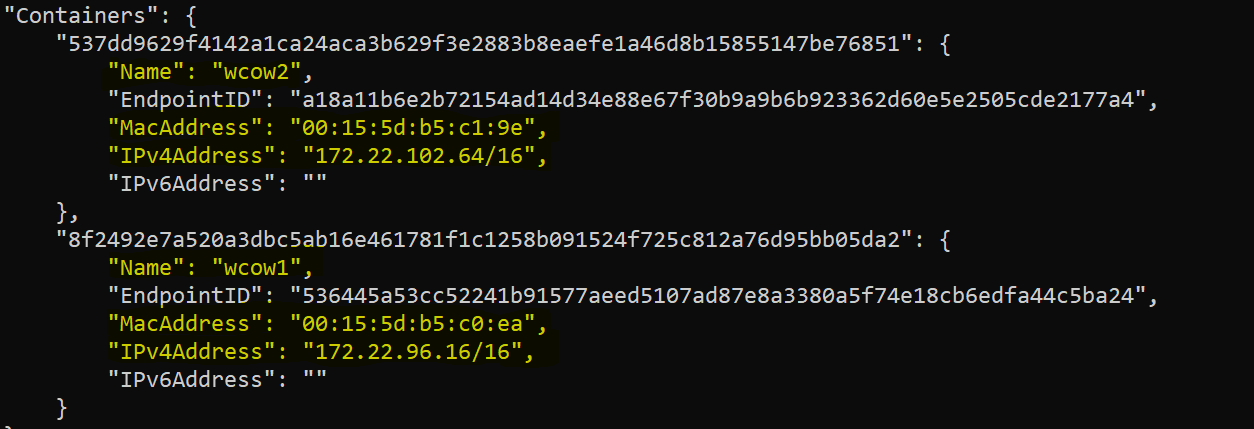
Docker network inspect try-nat

Both the containers are attached to the nat network and assigned the unique MAC address, IP address. Required for communication between two of them.
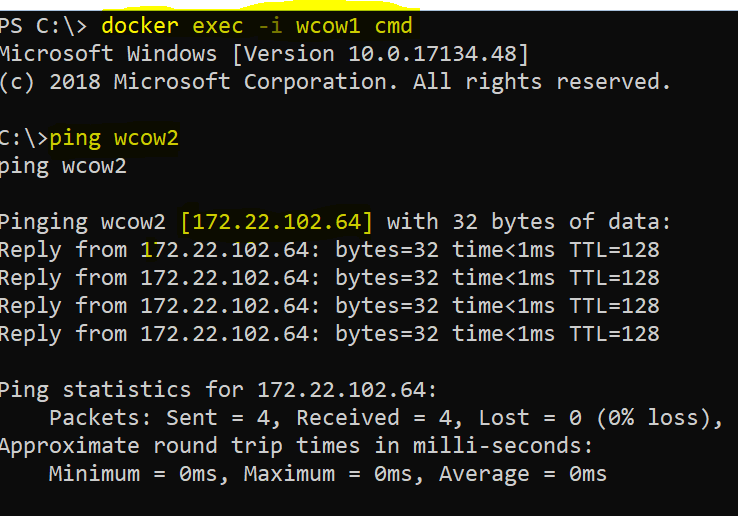
Let’s get inside in one of the containers and check the connectivity between both. Use “Docker exec” command to achieve the same.
Command
Docker exec  -it wcow1 cmd

CTRL P, CTRL Q to exit from the container.
Excellent, both containers are on the same network and able to communicate with each other. The running containers are hosting no service, therefore, (-p) argument was not used as no service is getting exposed.
Summary
This article is the first part of the networking series. In this post, we covered how containers communicate with each other and the way to capture the internal traffic by using NDIS provider. We also covered the architecture of the docker and how it interacts with lower level system components, i.e., kernel and cgroups. Started with NAT driver and perform creation of container attach with NAT and other tasks.